
When the Social Community group link is accessed through the Web Site module, the MemberFuse Web Site can be created and configured to match your organizational needs. The options to configure the community are displayed and explained below.
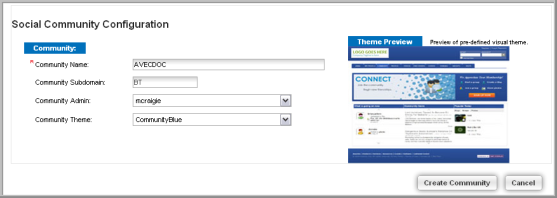
Community Name: The Community Name field is what your MemberFuse Social Community will be titled and also what will appear in search engines such as Google and Bing. Once you decide upon a Community Name and click the Create Community button this field may not be edited so give some thought as to what your Social Community should be titled.
Community Subdomain: The subdomain of your community is based upon the Site Code field found in the Web Site Editor under the General tab, seen below. It will already be populated with your entity’s site code and may not be edited.
![]()
The subdomain will also be part of your Social Community’s URL. For example, assuming your domain name for your Social Community is mymemberfuse.net, the subdomain precedes your domain name to make-up the entire URL for your Social Community site. The table below illustrates how your subdomain name plus your domain name will become your entire URL for your Social Community site using the sample domain name of mymemberfuse.net.
| Site Code | URL |
|---|---|
| SOCIAL | SOCIAL.mymemberfuse.net |
| avdemo12 | avdemo12.mymemberfuse.net |
Community Theme: Recall that when you choose a pre-defined theme on the Theme tab in the Web Site Editor that you are also choosing a default theme for your MemberFuse Social Community. The Community Theme field, as a result, is a reminder of which theme was selected during that process. If you want to make changes to this theme, you can update this using the Social Community link.

Tip: If the Create and use your own visual theme option is selected instead of the Choose a pre-defined visual theme option, the ‘Simple’ template option will be selected by default by the MemberFuse Social Community Web site (This template can be viewed under Theme options under the Theme tab in the Web Site Editor). This theme can be changed within the Social Community itself.
Community Admin: The Community Admin drop-down allows you to choose which licensed user is enabled to make administrator changes in the Social Community site itself. To populate this drop-down, a series of steps need to be taken. Those steps are as follows:
- Create a netFORUM CRM individual record for the licensed user you want to designate as a Social Community admin (that person will need to belong to the User or Admin access group before they can be designated a Social Community admin)
- Once an individual record is created within CRM for the person you want to make the MemberFuse Social Community admin, the netFORUM administrator must make this designation by following the remaining steps.
- Select the Administration module and then click the Maintain Users link under the Manage Your System Set Up Information section.
- Find the User Account of the desired individual and select it. When the User Account appears, note the Individual Record field. The Individual Record field is used to look-up the CRM record created for the desired Social Community admin.

- When this field is populated, this individual will appear in the Community Admin drop-down on the Social Community Configuration window, seen below. Remember, the User Account must have an Access Group of either User or Administrator and have a valid primary e-mail address before they may become a Social Community Admin. If the Community Admin drop-down is blank even after you have designated one or more admins, this means that they have the incorrect Access Group designated for their User Accounts.
Important: Only one administrator at a time may be designated through current netFORUM functionality. This means that for organizations that manage multiple entities, different staff members must be designated administrators for the different social organizations/entities (i.e., one staff member may not be the administrator for all social organizations/entities).

- Once you have completed all required fields on the Social Community Configuration window, click the Create Community button to create your MemberFuse Social Community. The following actions will occur
A hyperlink will appear and you will be prompted for your eWeb log-in. If you click and log-in, you will launch your MemberFuse Social Community so that you can begin populating it with content before releasing it to your members. This hyperlink that appears to log-in once you create your community is seen in the image below.

A navigation link will also appear in the Web Site Editor on the Navigation
tab so that, when you are ready, you can publish your MemberFuse Social
Community to eWeb enabling your customer’s access. This link is hidden by default
so you will need to edit and deselect the Hide/Disable Record checkbox before it
will appear on eWeb as seen in the image below. Before
you ‘go live’ with your MemberFuse Social Community, however, you need
to decide what netFORUM objects you want to activate.
