
Setting up Merchandise
Merchandise includes products such as books, downloadable publications, mugs, hats, etc. You have the ability to set up a member and non-member price for the merchandise.
To add merchandise, complete the following steps:
- Hover over the Modules tab in the top navigation bar. In the fly-out menu, click Administration. The Administration Overview page will appear.
- Expand the Merchandise group item in the left navigation bar and click Add Merchandise. The Merchandise Information page will appear. This page is divided into five sections:
- Merchandise Information - Contains the basic information about the product being added.
- Merchandise Availability for Sale - Contains the settings for when the product will be available for sale.
- Online Information - Contains the settings for selling this product in the eWeb Online Store.
- Publication Information - Contains fields specific to publication type products
- Product Delivery Information - Specify whether the product is shippable or downloadable and how downloadable products can be retrieved.
Steps to create a new merchandise item will continue below, broken up by section and the numbering will continue from above.
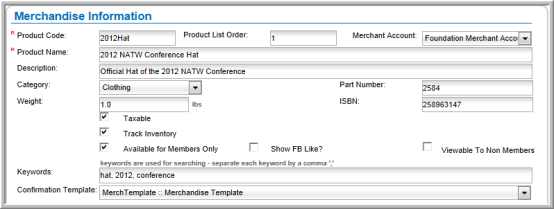
Section 1: Merchandise Information
The fields in the Merchandise Information section are used to identify the product as well as control certain aspects of how the product behaves when it is sold.
- Enter the identifying code for the product in the Product Code field (required). The product code field is limited to 25 characters.
- Enter the position in which this product should display in all lists and in the Online Store in the Product List Order field.
- Expand the Merchant Account drop-down field and select the merchant account to handle the accounting relative to the sale of this product.
- Enter the name of the product in the Product Name field (required). This is how it will be seen to shoppers in the Online Store and iWeb Shopping Cart. A product name field has a 100 character limit, including spaces. Using more than 100 characters in a product name will generate an error.
- Enter a short description of the product in the Description field.
- Expand the Category drop-down field and select the merchandise category for this product. Selecting a category allows you to sort products in the iWeb Shopping Cart and the eWeb Online Store.
- Enter the Part Number.
- Enter the Weight of the product.
- Enter the International Standard Book Number for this product in the ISBN field (normally only used for books.)
- Click the Taxable check box if tax is to be charged when this product is purchased.
- Click the Track Inventory check box if the available inventory for this product will be tracked.
If you are using a warehouse to manage your merchandise, this check box must be selected. Further, if you are using a warehouse to manage your inventory, this field will then be controlled by adding merchandise to the warehouse and you will not be able to edit/add quantity at the product level. This field will only be updated when you add this merchandise to your warehouse on the Warehouse Profile.
- Click the Available for Members Only check box if only members of the organization will be able to view and purchase this product.
If you click the Available for Members Only check box you will be presented with the Viewable to Non Members check box. Clicking this check box will allow this product to be seen by non members in the Online Store, but they will not be able to purchase it. - Click the Show FB Like? check box if you would like to include the Facebook Like icon on the product.
- Enter any keywords that may assist shoppers in finding this product in the Keywords field.
- Expand the Confirmation Template drop-down field and choose a correspondence template that will be e-mailed to individuals who purchase this product.
Using a Confirmation Template is particularly useful for providing download instructions for individuals who purchase a downloadable product.
Section 2: Merchandise Availability for Sale
The Merchandise Availability for Sale section of the form allows you to specify when the new product will be available for sale, highlighted, or made inactive.
- If the product is to be made unavailable for sale, click the Inactive check box. If the product is to be available, leave this check box unchecked.
- Enter the Available From and To dates in their respective fields. You can manually enter the dates, or use the calendar picker to choose them from a calendar.
- Enter the dates you would like to feature this product as a "new" product in the Show as New From and To fields. You can manually enter the dates, or use the calendar picker to choose them from a calendar.
- Enter the dates you would like this product to be displayed as a "featured" product in the Featured Product From and To fields. You can manually enter the dates, or use the calendar picker to choose them from a calendar.
In order to use this functionality you must have the featured product system option enabled.
![]()
Section 3: Online Information
This section allows you to specify whether this product will be available in the Online Store on eWeb, or just in the iWeb Shopping Cart.
- Click the Sell Online check box to allow this product to be sold in the eWeb Online Store.
- Specify the dates you would like this product to be available in the Online Store in the Sell Online From and To fields. You can manually enter the dates, or use the calendar picker to choose them from a calendar.

Section 4: Publication Information
The Publication Information section is used to denote whether the new product is a publication. If it is, you may wish to enter specific information about the publication in the following fields.
- If the new product is a publication, click the Publication check box. Clicking this check box causes the following additional fields to appear.
- Enter the copyright date of the publication in the Copyright Date field. You can manually enter this date, or use the calendar picker to choose it from a calendar.
- Enter the date published in the Publish Date field. You can manually enter this date, or use the calendar picker to choose it from a calendar.
- Enter the name of the Publisher and the Author of the publication.
- Use the Format drop-down field to indicate the format of the publication (e.g., paperback, hardcover, etc.).

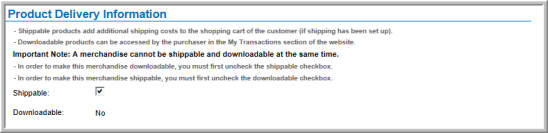
Section 5: Product Delivery Information
The Product Delivery Information section allows you to specify if the new product is shippable or is downloadable. If it is a downloadable product, you will have the option to provide additional settings regarding the download.
- Click the Shippable check box if the new product will be shipped to those who purchase it.
- Click the Downloadable check box if the new product will only be available via download.
If the product is a downloadable product, please view the Setting Up Downloadable Products help topic for complete instructions
-
Click the Save button. The Merchandise Profile will appear
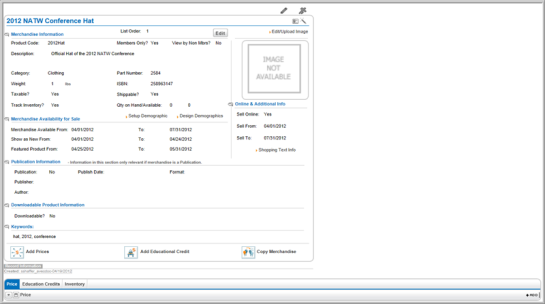
You must also add a price for your new product. Please visit the Adding a Price for Merchandise help topic for full details. You may also wish to add price qualifiers to your new product. Please visit the Setting up Price Qualifiers help topic for more information.