
Adding a Fund
A fund is used to generate revenue for a cause. Suggested amounts may be set up for any kind of donation. For example, memorial gifts, education programs, or disaster relief. You can add one or more campaigns to a fund.
Adding a Fund in netFORUM Pro
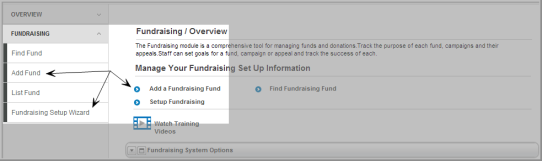
- Hover over the Modules tab in the top navigation bar. In the fly out menu, click Fundraising. The Fundraising Overview page will appear.
- There are several links on the Fundraising Overview page that allow you to add a new fund. Add a fund by:
- clicking Add a Fundraising Fund, or
- expanding the Fundraising group item in the left navigation bar and clicking Add Fund.
- The Fundraising Product Information form will load.
Completing the Fundraising Product Information Form
- In the Fundraising Product Information section, enter a Product Code (required).
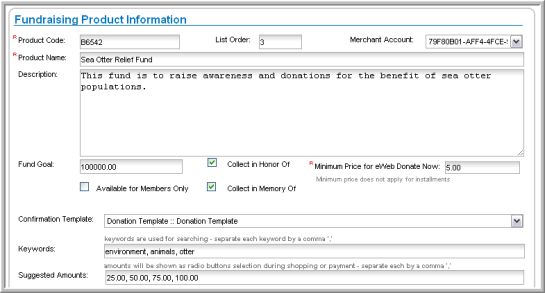
- To control the order in which the Fund will appear relative to other products in the shopping cart, enter the order number in the List Order field.
-
If this donation is associated with a specific Merchant Account, select the appropriate choice from the Merchant Account drop-down menu.
You must have the AllowMultipleMerchantAccounts system option enabled for this ability and drop-down to appear. View the Setting Up Multiple Merchant Accounts online help topic for more information.
- Enter a Product Name (required).
- Use the Description field to record a detailed description of the fund.
- Enter the desired goal amount in the Fund Goal field.
- To enable contributors to make donations in honor of and/or in memory of a special person, place, or thing, click the Collect in Honor Of or Collect in Memory Of check box. During purchase, a contributor will have the option to enter a name in one or both of these fields.
- In
the Minimum Price for eWeb
Donate Now field, enter the minimum donation amount acceptable for this fund from individuals who use the eWeb Donate
Now page (required). If there is no minimum amount, enter a zero
in this field.
The amount entered in the Minimum Price for eWeb Donate Now field will display on the eWeb Donate Now page, as shown in the screen shot below.- If an individual tries to donate less than the minimum amount, they will receive a warning message and will not be allowed to complete their donation until it is greater than or equal to the minimum amount specified.

- Click
the Available for Members
Only check box if the contribution is available for members
only.
When this check box is clicked, you have the option to control whether non-members can view this item in the Online Store. Leaving this check box empty allows both members and non-members to view this item in the Online Store even if only members are allowed to purchase it. - Select a Confirmation Template from the drop-down field.
- In the Keywords field, enter keywords to help users find the Fund online.
- To include radio buttons that display suggested contribution amounts, enter amounts for each radio button (separated by a comma) in the Suggested Amounts field.
- Under the Fundraising Product Availability for Sale section of the form, if the Inactive check box is clicked, the Fund will not be available via the eWeb shopping cart.

- In the Item Available From and To fields, enter the start and end dates in which this Fund will be available. The Fund will only be available for contributions within this date range.
- Enter Show as New From and To dates to highlight the Fund as a new product. The word "New" will be added to the product name in the Shopping Cart during this date range.
- Enter Featured Product From and To dates to highlight this Fund as a "featured" or "promotional" product in the Shopping Cart banner.
- In the Online Information section of the form, click the Sell Online check box to sell the fund online.
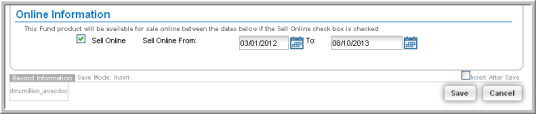
- Enter the Sell Online From and To dates to make it available online within that date range, if applicable.
- Click the Save button.