
There are two different methods of making a donation to a Fund through eWeb; through the Online Store and through a Fundraising link. The Online Store method is similar to Purchasing a Fund through iWeb. Your customers will need to be logged-in and have an account before they may use this feature. View the section on Purchasing a Fund through the Online Store for more details.
You may also enable a separate Fundraising link that does not require a log-in; where the customer may donate as a guest and then a customer record is created upon completion for tracking purposes. You may title the Fundraising link anything you wish, such as “Donate Now”.
To enable a Fundraising button through eWeb, complete the following steps:
- From the Web Site module, step through the Web Site Wizard until you arrive at Step 3, Web Site Components, seen below.
- Select the Fundraising component checkbox.
- The Link Text you enter for the component will be the button name, such as Donate Now.
- Notice also that Login-Required checkbox is not selected nor is the Member Only checkbox. Make sure you complete the wizard process and Save.

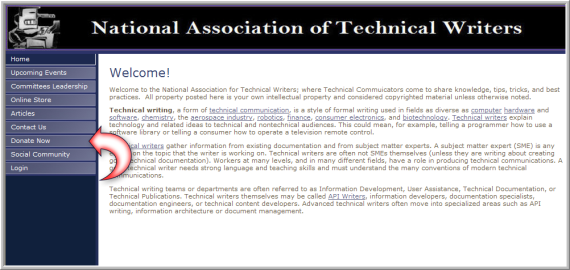
The button you enabled will now be visible on your eWeb Web Site.
When the Fundraising button is clicked by a visitor to the site, the Select Donation page appears. Note that this text may be edited through the Web Site Editor under the Content tab. Each Fund that has the Sell Online checkbox selected during set-up will be present for selection.
Visitors to your Web Site will complete the following steps to make a contribution to a Fund:

- Click the Fund that you would like to make a contribution to. The Donation Information page for the Fund appears.
- The Purpose drop-down may be used to specify where the donation be used. The Purpose must have the Active checkbox selected in Fundraising Module Setup and the Show Online button selected when Linking a Purpose to a Fund in order to appear in this drop-down.
- If installment billing has been set-up in the Price Controls, the Pledges drop-down may be used to set-up a pledge for the default price set-up. Note: The Select Amounts radio buttons will no longer be used if a Pledge is made.
- If the Suggested Amounts field was completed when Adding a Fund, each amount is present using the Select Amounts label. The customer may choose an amount or click the Other Amount radio button and fill in his/her preference.
- The customer may then complete the Billing and Payment Information sections to complete the donation. Note that a customer record will be created when the Donate Funds button is clicked. For duplicate records, it is suggested that a Merge and Purge is conducted.

The customer’s CRM record will also contain the donation under the Purchases tab > Donations Purchased child form.
