
Using the Fundraising Setup Wizard
To assist in creating Funds available in netFORUM Pro Pro, the Fundraising Setup Wizard is available. The Fundraising Setup Wizard can be accessed in the Fundraising module and walks you through all of the necessary steps to create a Fund.
To create a new Fund using the Fundraising Setup Wizard, complete the following steps:
Launching the Fundraising Setup Wizard
- Hover over the Modules tab in the top navigation bar. In the fly out menu, click Fundraising. The Fundraising Overview page will appear.
- Expand the Fundraising group item and click the Fundraising Setup Wizard option.
Fundraising Setup Wizard - Step 1
Step 1 of the Fundraising Setup Wizard leads you through naming your fund and deciding how/where it will be displayed.
- Enter the code to be used for searching and/or reporting purposes in the What code would you like to assign for searching/reporting purposes? field. (Required)
- If applicable, enter the order that this product should display in a list of Funds in the Product List Order field. (Optional)
- Expand the Merchant Account drop-down and select the appropriate Merchant Account to be used for accounting purposes. (Optional)
- Enter the name for this Fund in the Fund Name field. (Required)
- If a goal has been set for this Fund, enter that goal in the Fund Goal field. (Optional)
- You may enter a description for this Fund in the What description would you like to display in the cart? field. (Optional)
-
If this Fund can be collected in honor of an individual, check the Do you collect in honor of? checkbox. (Optional)
This will enable this field on the appropriate iWeb and eWeb forms.
- If this Fund will only be available to members of your organization, check the Is this for members only? checkbox. (Optional)
- To assist individuals in finding your Fund , you may wish to add keywords in the Keywords field. These keywords must be separated by a comma. (Optional)
- Expand the Should the new Fund product automatically send out a confirmation eamil to the customer when purchased? If yes, select a confirmation template drop-down menu and select a confirmation template if you wish to automatically send out a confirmation E-mail when a donation is made to the Fund.

- Click the Next button.
Note: If at any point during this process you wish to save your donation product, you can click the Save Now button.
Fundraising Setup Wizard - Step 2
Step 2 of the Fundraising Setup Wizard leads you through deciding when and where the Fund will be available. It also leads you through entering suggested donation amounts which will improve the ease of use for your members in using the Fund. In addition, adding suggested amounts to a Fund will allow it to be visible on all purchase forms related to memberships (including renewals.) However, demographics will not be (or will in honor of.)
- If you aren’t ready for the Fund to be available for online purchase, check the Would you like to disable this donation for now? checkbox. (Optional)
- Enter the dates when the Fund will be available for online sale by selecting (or entering) dates in the Fund is available for purchase starting when? and Ending When? fields. (Optional)
- If you would like this Fund to be highlighted as
a new product in the shopping cart, enter the start and end dates
for the “new” designation in the Do
you want to indicate this donation as “new” in the shopping cart?
fields.
- Enter the start date for the “new” designation in the If yes, starting when? field. (Optional)
- Enter the end date for the “new” designation in the Ending when? field. (Optional)
- If you would like the Fund to have a “featured”
designation in the shopping cart you must enter the dates for
that designation to be in effect.
- Enter the start date for the “featured” designation in the If yes, starting when? field. (Optional)
- Enter the end date for the “featured” designation in the Ending when? field. (Optional)
- If you would like this Fund to be available on eWeb, check the Would you like to take donation purchases via the web site? checkbox. (Optional)
- Enter the date that this Fund should be available on eWeb in the When should the donation be available for online purchase by customers? field. (Optional)
If you would like to set up suggested donation amounts, you must enter those suggested amounts (each separated by a comma) in the To give customers the ability to donate at the time of shopping for products, please enter the various donation amounts. These amounts will be shown as radio buttons for selection during shopping or paying of open orders. Separate each by a comma “,” field. (Optional)
While this field is optional, it is an extremely important field. If the Fund is active and suggested amounts are entered in this field, users who are purchasing or renewing membership products will be prompted to contribute to this Fund in the Shopping Cart on orders and only if run in a renewal batch.
If no suggested values are entered in this field, users will not be prompted to contribute to this Fund.
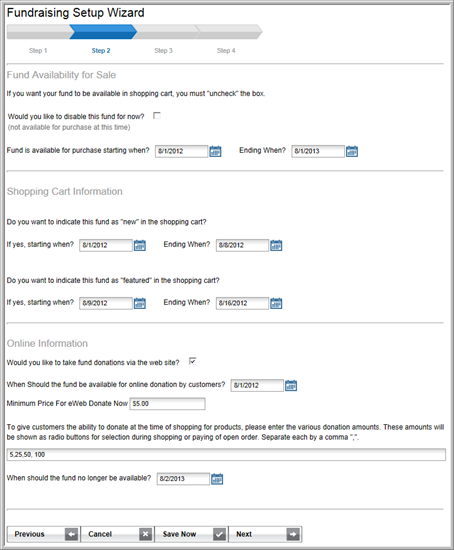
- Click the Next button.
Fundraising Setup Wizard - Step 3
Step 3 of the Fundraising Setup Wizard leads you through the steps to set fees that can be tracked with charge codes to your Fund.
- Enter the abbreviated code for the fee that will be charged for this Fund in the What is the abbreviated code for this fee? field. (Required)
- Enter the name of the fee in the Fee Name field. (Required)
- Select the charge code used to track these fees from the What charge code should be used to track this donation types financial transaction? drop-down menu. (Required)
- Enter the fee to be charged to members and non-members
for this Fund.
- Enter the fee for members in the What is the fee for Members? field. (Required)
- Enter the fee for non-members in the What is the fee for Non-members? field. (Required)
- If this is the most used fee for this Fund (default fee), check the Is this the most used fee for the donation, then check this box to always display this fee in the cart checkbox. (Optional)
- By default, this fee will be available in the online shopping cart. If it is not to be available in the online shopping cart, deselect the Is this fee available in the online shopping cart? checkbox. (Optional)
- Enter the date for this fee to begin to be available in online shopping in the When does this fee begin to be available for online shopping? field. (Optional)
- Enter the date this fee will no longer be available in online shopping in the When does it end? field. (Optional)
- Click the Allow Installments? check box if installments are permitted for this fee. (Optional)
- If installments have been enabled, expand the Frequency drop-down menu and select how often an installment payment will be required. (Required if installments enabled)
- Expand the Installments drop-down menu and select how many installments will be allowed. (Required if installments enabled)

- Click the Save button.
The Step 3 screen will refresh and display the fees you just entered. If you wish to add additional fees, click the Add New Rate button and repeat steps 1 – 9 of this section.
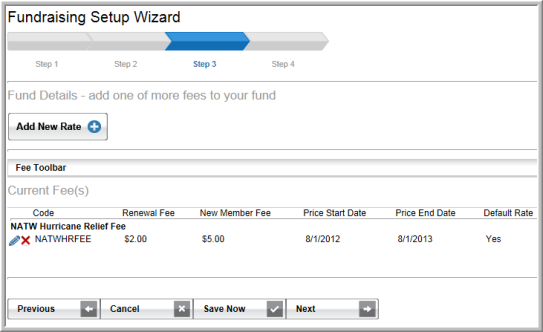
- Click the Next button.
Fundraising Setup Wizard - Step 4
Step 4 of the of the Fundraising Setup Wizard provides a short summary of all you have done so far with the new Fund. This step will also lead you to the Fund Profile that lists the details of your Fund and provides links to allow you to edit the Fund.
You may choose to navigate back in the process by clicking the Previous button.
Cancel the Fund setup by clicking the Cancel button.
You may also save the Fund for use by clicking the Save button.
- Click the Save button to save your new Fund.
- Click the Done button. After clicking the Done button, you will be taken to the Fund Profile Page that lists the details of your Fund.
You will notice Edit buttons that will allow you to go in and edit certain portions of the Fund.
You can also click the Setup Wizard button to launch the Fund Setup Wizard to edit your Fund.