
Setting up Invoice Template Information
You can customize your invoice template by adding a report header, invoice text, and invoice signature.
To set up Invoice Template Information:
- Click the Accounting hyperlink on the Module Menu to open the Accounting Overview page.
- Click the Set Up link.
- Expand the Account Information child form.
- On the Accounting Information page, click the Edit
 icon next to your entity name.
![]()
This will open the Account Information pop-up window.
- In the Client Information section of the pop-up window, fill out the information that will appear on the invoice:
- Organization
- Address (multiple fields available if necessary)
- City/State/Zip
- Country
- Web Site
- Click the Save button.

To add invoice messages and signatures to your template, view the following Help topic:
Adding a Message or Signature to an Invoice.
Adding a Graphic to an Invoice
To add a graphic to your invoice:
- Click the Administration hyperlink on the Module Menu to launch the Administration module..
- Click the Image Gallery link to open the Image Gallery.

- On the Image Gallery page, locate the Reports Header Image section and click the Upload button. This will open the Image Upload pop-up window.
- Click the Browse button to locate the graphic file.
- Double-click on the file name or left-click to highlight the file and click the Open button.
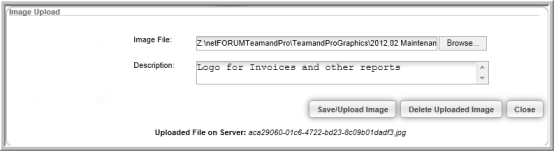
- If desired, enter a short description of the image in the Description field.
- Click the Save/Upload Image button.
The image is uploaded to the Image Gallery and ready to be inserted into your invoice.

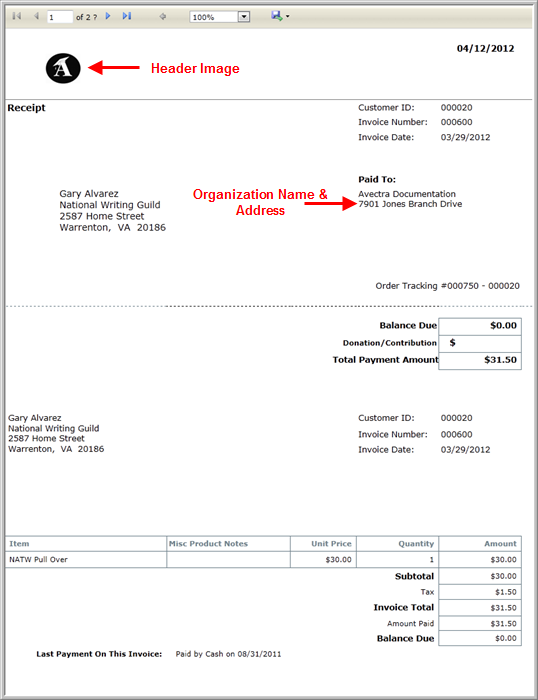
The invoice is customized with the Report Header Image and the organization name and address added earlier.
For more customizations available for invoices, see the following help topic Creating Hard Copy Invoices.