Copying an Event
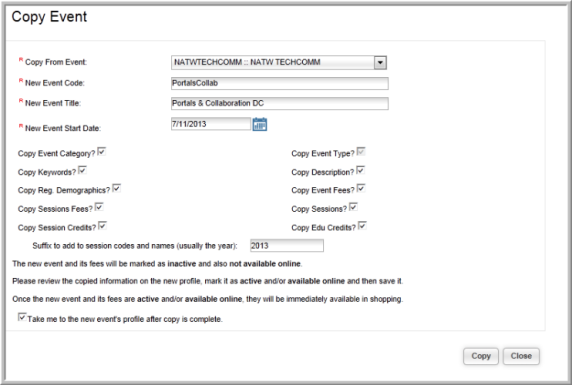
When setting up a new event, if you have an event with similar data, you can copy the event information using the Copy Event feature. (This copies the event sessions and session fees, as well.) The options for "restrict capacity," "available for members only," "allow wait list purchase," "allow guests," and "track scores/grades" will be copied to the new event. You can choose whether or not to copy the event type, category, description, keywords, and custom demographics.
To copy an event:
- Go to the Event Profile.
- Click the Copy Event hyperlink found in the Links menu at the top of the Event Profile.

In the Copy Event window, the Copy From Event drop-down field is automatically populated from the Event Profile you are copying from with its Event Code and Event Name. You may select a different event in this field if desired.
- Enter the New Event Code for the new event you will be copying to.
- Enter the New Event Title for the new event you will be copying to.
- Enter the New Event Start Date for the new event you will be copying to.
- Review the check boxes. If there is information that you do not want to copy, clear the appropriate checkbox(es).
- If you want to add a suffix to the session names (e.g., the year) enter the suffix in the Suffix to add to session codes and names field. This field is not required. If a suffix is not entered, the session names will be copied as they are from the original event.

- To go to the new Event Profile after saving your data, select the Take Me To The New Event’s Profile After Copy Is Complete check box.
- Click Copy to create the new Event Profile. Do not click this button twice or you will copy the event twice.
Note: If EDU credits have been set up for an event that have different start and end dates than the start and end dates for the event itself note that when the event is copied, the new EDU credit start and end dates will become the copied event's start and end dates.
The new Event Profile will show that the Event is Inactive and Registration is Closed. When you are ready to display the event in the Shopping Wizard and make it available online, you will need to go to the Edit Event form and clear the Inactive check box by activating the event. Step-by-step instructions on finalizing your event copy are detailed on the Activating a Copied Event help topic.
