
Adding an Event
The Event Profile contains all of the event information including the event code, event type, event title, event description, event registration capacity, estimated attendance, meeting goal, keywords, event dates and times, registration deadlines, whether or not the event registration and fees are available online, and information about the event registration confirmation template.
From the Events Profile, you can add additional event-related information, for example, Registration Fees, Sessions, Locations, Sponsors, Registration Details, and Event Registrations.
Note: To add speaker information, you must create a Speaker Profile and then assign the speaker to a Session.
There are two ways to add an event. You may choose to add the event from the Events/Overview page by clicking on the Add an Event link (described below) or you can use the Event Set-Up Wizard. The Event Set-Up Wizard will lead you through the basic subset of fields necessary to create an event, while the Add an Event link will give you access to all event fields and provide you with total control over event set up.
Visit the Using the Event Set-Up Wizard help topic for more information on using the Event Set-Up Wizard.
To add an event:
-
Hover over the Modules tab in the top navigation bar. In the fly out menu, click Events.
-
On the Events Overview page, click Add an Event.

-
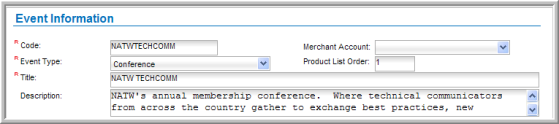
On the Event Information page, enter an Event Code (e.g., reference number or catalog number).
-
Select the Merchant Account that event registrations will be charged to.
-
To control the order in which the Event will appear relative to other products in the shopping cart, enter the order number in the Product List Order field.
Note: The order of appearance for all products is now dictated fully by the Product List Order. If no Product List Order is present, the product that was created last (or has had the most recent update) will be present at the top of the list. In addition, if two products have the same Product List Order, the most recently saved/updated product will be at the top of the list.
-
Select an Event Type.
-
Enter an event Title. This will appear in the Online Store for registration.
-
Enter an event Description.
-
If you want to restrict the number of people attending the event, select the Restrict Capacity check box. If this check box is selected, also enter the Capacity, or total number of registrations allowed.
Note: The Currently Available field displays how may registrations are left based upon the Capacity field you have set up. If you increase or decrease the Capacity field, the Currently Available field will update appropriately based upon current registrations.
-
Enter the Estimated Attendance, (not required).
-
If you want to restrict this event to members only, select the Available for Members Only check box.
-
If you want to be able to add people to a "waitlist" even though an event is full, select the Allow Waitlist check box.
-
Select the Allow Guests checkbox to enable guest registration.
-
If you want to track scores or grades, select the Track Scores/Grades check box.
-
Select the Allow Substitute checkbox to enable individuals to substitute one registration for another individual registration at no extra cost.
-
If you want this event to be free, select the Free Event checkbox.
-
Select the Check for Conflicting Sessions check box if you want this event to check and disable sessions that conflict with it when a customer registers. Once registered, all other conflicting sessions will be grayed out and unavailable for registration until the current event dropped. If this check box is not selected, customers may register for any number of events even if occurring on the same date/time.
-
Select the Taxable check box if event registrations are taxable.
- Select the Do not allow duplicate registrations check box to prevent individuals from registering for an event multiple times.
Note: This check box is selected by default.

-
Select an Event Category.
-
Enter an Event Goal (not required).
-
Enter Keywords to be used when searching for the event online (not required).
-
If you desire to link an Affiliate to your Event, use the Affiliate drop-down field.
- Enter an event Location (not required).
-
Select a Confirmation Template that is to be sent to registrants upon a completed registration. (You may Edit
 the current template or Add
  a new one as well.)
![]()
To add key event dates and times:
-
Enter a Start Date and Time (e.g., 01/01/08, 9:00am).
-
Enter an End Date and Time (e.g., 01/01/08, 5:00pm).
-
Enter the Regular Registration Begin Date.
-
Enter the Regular Registration Cut-off Date. (The cut-off date is the date late registration begins.)

To add a Time Zone:
Expand the Time Zone list and select the appropriate time zone for this event. This is important if the event is online and "attendees" will be in different time zones.
To enter event availability and event advertising dates:
-
Enter an Event Available From date and Available To date. (The event will be available in the Shopping Cart during this time period.)
-
Enter a Show as New From date and New To date. (The event will display in the New Products list during this time period.)
-
Enter a Featured Product From date and Featured To date. (The event will display in the Featured Products banner during this time period.)
Note: The order of display for Featured Products is determined by the position specified in the Product List Order field (above.) If two (or more) Featured Products have the same Product List Order specified, the most recently modified or added Featured Product will be displayed first (of those that share the same Product List Order value.)
-
Use the Inactive check box if you want to remove the registration ability. This is useful if you want to set up the Event and have it prepared to go but are not ready to begin accepting registrations until the appropriate dates.

To work with group registrations:
- Select the Allow Group Registrations check box to display additional group registration options:
- Select the For All check box to allow group registrations by all criteria.
- Select the By Primary Contacts check box to allow group registrations by primary contacts.
- Select the By CRM Relationship Types check box to allow group registrations by CRM relationships.
- Select the Allow Individual Rates check box to allow individual rates to be selected during group registrations.

To post event information online:
-
Select the Sell Online check box.
-
Enter Sell Online From and To dates. (Event registration information will be available online during this time period.)
-
To display Registration Fees online select the Show Registration Fees Online check box.
-
Click Save.

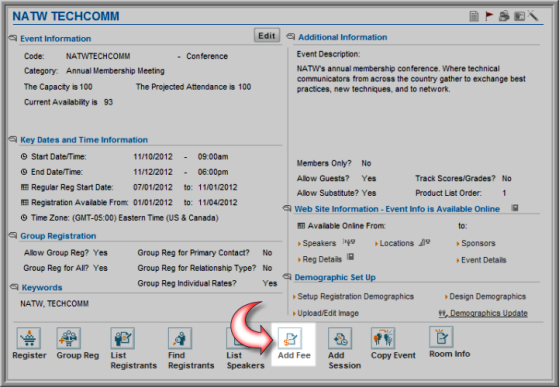
Note: You must add Event Registration Fees from the Event Profile.
To add an event registration fee:
-
On the Event Profile, click Add Fee.
-
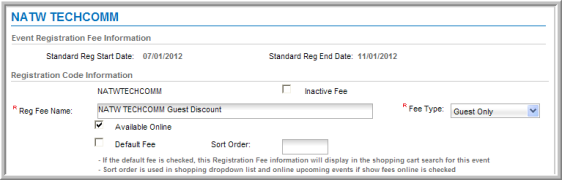
In the Event Registration Fee Information window, enter the Fee Name (e.g., Standard Registration Fee, Late Registration Fee).
-
Select what kind of Fee Type it will be; for the customer only, a guest or both by selecting All.
-
Select the Available Online check box to display the Event and Registration Fee online.
-
If this is to be the Default Fee, select the Default Fee check box.
-
Use the Sort Order field to define the order of Registration Fees.
-
Select Charge Codes for Early Registration, Regular Registration, and Late Registration.
-
Enter Member Fees. (If there is no discount for members, enter the "Non-Member Fee.")
-
Enter Non-Member Fees.
-
Select Price Qualifiers, if desired.
-
Click Save.
